Home EV Chargers: Level 1, Level 2 and What to Buy
A Level 2 EV charger is worth considering when a standard outlet cannot replace your daily driving during your usual parking time. Choose around your vehicle's connector and charging limit, your home's electrical capacity and whether you need plug-in charging, hardwiring or load management.
On this page (13 sections)
- What is a Level 2 EV charger?
- Is a Level 2 EV charger better than Level 1?
- What should you check before buying a home Level 2 charger?
- Which home EV charger type fits your situation?
- How much power does a home EV charger need?
- Should you choose a plug-in or hardwired installation?
- What does Level 2 EV charger installation involve?
- Which smart features are worth having?
- How should you use and care for a home EV charger?
- What safety checks matter for home EV charging?
- What common buying mistakes should you avoid?
- How do you choose between these home EV chargers?
- Which home Level 2 EV charger should you buy?
A Level 2 EV charger makes sense when a standard outlet cannot replace your daily driving during the hours your car stays parked. The right choice fits your vehicle, electrical capacity and parking space before it adds extra speed or app features.
Start with the energy you need to replace on a normal day. Then check the car's charge port and AC charging limit, measure the cable route and get an electrical assessment before ordering.
For most homes, the main choice is between a straightforward plug-in unit, an app-connected charger and a system that manages charging alongside household electricity use. Each solves a different problem.
This guide explains those decisions and compares four examples. For a closer look at the two charging levels, see Level 1 vs Level 2 EV chargers.
What is a Level 2 EV charger?
A Level 2 EV charger supplies power through a 240V circuit, allowing faster home charging than a standard 120V outlet. The actual charging rate depends on the car, the charger's configured output and the electrical installation.
The wall unit is also called EVSE, short for electric vehicle supply equipment. It controls the safe delivery of electricity, while the car's onboard charger converts AC power to charge the battery.
This distinction matters because a more powerful wall unit cannot increase the car's onboard charging limit. Once the car reaches that limit, extra available output provides no further speed.
Level 2 home charging also differs from public DC fast charging. A home wall unit does not provide the same rapid charging used for short highway stops.
A plug-in model connects to a matching receptacle, while a hardwired model connects directly to the home's wiring. Either approach needs an electrical installation suitable for sustained charging.
Is a Level 2 EV charger better than Level 1?
Level 2 is better when you need to replace more energy in less parked time. Level 1 can still be the right choice for light driving, long overnight stops or a plug-in hybrid with modest daily charging needs.
| Consideration | Level 1 | Level 2 |
|---|---|---|
| Power source | Standard 120V outlet | 240V circuit |
| Installation | A suitable outlet and circuit still need checking | May need a new circuit, receptacle or hardwiring |
| Charging pace | Slower | Faster, within car and circuit limits |
| Best fit | Light driving and long parked periods | Higher daily use or shorter charging windows |
| Main decision | Does it replace your daily energy use? | What output can your home support? |
Look at several ordinary days rather than your longest road trip. A charger that covers your commute, errands and usual evening driving can meet your needs without replacing an almost empty battery overnight.
Also consider your actual arrival and departure times. Someone parked from early evening until late morning has more charging time than someone who arrives near midnight and leaves before dawn.
Cold weather, cabin heating, highway driving and towing can increase energy use. Leave some room for those changes rather than sizing the setup around your easiest day.
If Level 1 already keeps the battery where you need it, faster charging is mainly a convenience upgrade. Our guide to whether you need a Level 2 charger at home helps you make that call.
What should you check before buying a home Level 2 charger?
Check connector fit, useful charging output, electrical capacity and cable reach before comparing features. A charger that misses any of those basics is the wrong choice, even if its other features appeal to you.
Which connector does your Level 2 EV charger need?
Match the charging handle to the port described in your vehicle manual. J1772 is common on older non-Tesla EVs, while Tesla and some newer vehicles use NACS.
The connection at the car and the connection at the wall are separate choices. A NEMA 14-50 plug describes the wall connection, not the handle that plugs into your vehicle.
An adapter can bridge some connector differences, but it must support the vehicle, AC charging method and intended current. Do not assume an adapter for public fast charging also works for home charging.
For the connector basics, read J1772 vs NACS. Our NACS and J1772 adapter guide explains why the direction of the connection matters.
How much charging output can your car use?
Check the vehicle's maximum AC charging power, usually expressed in kilowatts. That figure helps you avoid paying for installation capacity the car cannot use.
A vehicle with a lower onboard charging limit can use a compatible higher-output charger, but it will draw only what it supports. The extra capacity may serve a future vehicle rather than shorten today's charging sessions.
For a household with two EVs, check both vehicles separately. Port location, connector type and charging needs may differ enough to affect the whole installation plan.
How many amps can your electrical setup support?
Have an electrician assess the panel, service capacity, wiring and proposed circuit before choosing the final current setting. An empty breaker position does not prove that the home has enough capacity for another large load.
The charger's output setting must suit the complete installation. A larger breaker alone does not make existing wiring or a receptacle suitable for more current.
Ask for the permitted charging output in writing as part of the installation plan. Our guide to how many amps a Level 2 charger needs explains the choices before that conversation.
Will the cable reach without creating an obstacle?
Measure the route from the proposed wall unit to the car's port, including bends around the vehicle and clearance for the connector. Straight-line distance across an empty garage can underestimate the cable you need.
Plan around the way you normally park. A location that works only when you reverse into a tight space may become a daily nuisance.
Keep enough slack to connect without pulling on the handle. The cable should also store clear of garage doors, tires, walkways and sharp edges.
Which home EV charger type fits your situation?
Choose a charger around the job it needs to do: fixed app-connected charging, charging from an existing outlet, straightforward plug-in use or household load management. The four options below suit different installation plans.
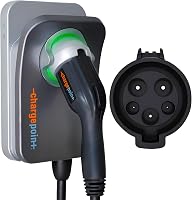
ChargePoint HomeFlex 50A Hardwired Charger: for a fixed app-connected setup
This HomeFlex has a J1772 connector, a 23 ft cable and adjustable output from 16A to 50A. ChargePoint certifies it to UL requirements and supports indoor or outdoor installation, with a cold-resistant cable.
Choose it if you want a permanent charging location and use app controls to manage charging information, reminders and connected features. Some functions and troubleshooting steps require Wi-Fi, so check reception where the unit will sit.
The hardwired format also suits a new installation where there is no useful reason to add a receptacle. Ask the electrician to configure the output for your circuit and vehicle rather than defaulting to the maximum.
Skip this version if you specifically want a removable plug-in connection. A driver who wants a native NACS handle should also compare that requirement before accepting the extra step of an adapter.
Its higher available output matters most when your car can accept it and your charging window is short. If you park overnight and need only a modest refill, a lower configured output can be enough.
ChargePoint HomeFlex NEMA 14-50 Charger: for an existing outlet and app controls
The plug-in HomeFlex provides up to 40A through a NEMA 14-50 connection, with a J1772 handle and a 23 ft cable. Its app offers charging controls, reminders and charging information.
Choose it if you have a suitable outlet in the right location and want ChargePoint's app features. ChargePoint specifies a 40A or 50A circuit, with charging output configured for the installation.
An electrician should inspect an existing receptacle and confirm its wiring and circuit before regular charging begins. A socket that fits the plug is only one part of a suitable setup.
Skip this version if you need more output than its plug-in configuration supports. It also loses much of its practical advantage if the outlet is far from the car or needs major work to become usable.
ChargePoint identifies this model as UL certified and suitable for indoor or outdoor installation. Tesla use requires a suitable adapter, and any other vehicle with a different port needs the same compatibility check.
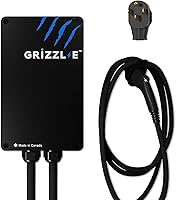
Grizzl-E Classic 40A NEMA 14-50 Charger: for straightforward plug-in charging
The Grizzl-E Classic pairs a metal enclosure and 24 ft cable with a plug-in connection. Grizzl-E identifies it as UL certified, IP67 water resistant and suitable for indoor, outdoor and cold-weather use.
Choose it when the main job is to connect the car and replenish its battery. Its appeal is the straightforward charging format, especially if your vehicle already handles the scheduling you need.
The available current settings allow an installer to match output to a suitable circuit. Grizzl-E pairs its maximum output with a 50A breaker, but the full installation still needs assessment.
Skip it if your main goal is included whole-home energy monitoring or automatic coordination with household electrical demand. The Emporia option below is the more relevant starting point for that need.
For occasional relocation, remember that a plug does not make every destination suitable. Each outlet and circuit must support the intended charging load, and the connector must suit the vehicle.
Emporia Pro 48A Hardwired Charger: for managing charging with household demand
The Emporia Pro includes a J1772 handle, 25 ft cable, Vue Home Energy Monitor and PowerSmart software. Emporia says PowerSmart adjusts charging load alongside household electricity use.
Choose it if available electrical capacity is a central concern or you want to see charging within your home's wider energy use. Its app supports charging schedules and real-time usage tracking.
The hardwired version supports up to 48A, and Emporia recommends professional installation. The monitor adds work at the panel, so include that part of the system when requesting a quote.
Skip it if you want only a basic wall unit and have no use for monitoring or load management. Those features address a specific need rather than making every installation simpler.
Ask the electrician whether PowerSmart can help your particular home before assuming it avoids a service upgrade. Emporia backs the charger with a 3-year warranty covering manufacturing defects or malfunctions under normal use conditions.
How much power does a home EV charger need?
Choose enough power to replace your usual energy use within your available charging time. Maximum output is useful only when your driving, vehicle and installation can benefit from it.
Start with the car's energy-use display if it provides a useful average. Multiply that use by your typical daily distance to estimate how much energy you need to replace.
For example, driving 40 miles at an average of 3 miles per kilowatt-hour uses about 13 kWh. Allow extra charging time for energy losses and changes in driving conditions.
A simple charging estimate is energy needed divided by charging power. Replacing 15 kWh at 6 kW takes about 2.5 hours before allowing for losses, battery management and other limits.
Treat that calculation as a planning tool rather than a promised finish time. Weather, battery temperature and the vehicle's controls can affect actual charging.
A lower-output setup may cover that daily refill comfortably during a long overnight window. Higher output becomes more useful when you arrive late, leave early or need several charging sessions in one day.
The breaker number is not the charging output. EV charging is a sustained load, and the permitted setting depends on the circuit design and applicable requirements.
Read what size breaker a Level 2 EV charger needs before discussing options with your electrician. Ask for a circuit and output recommendation together.
Should you choose a plug-in or hardwired installation?
Choose plug-in charging for a suitable existing receptacle and hardwiring for a fixed connection or higher supported output. If both options require a new circuit, compare the complete installed work rather than the charger alone.
A plug-in unit can be easier to remove if you move or replace it. That advantage depends on the next location having the right electrical supply and a suitable mounting position.
Frequent unplugging should not be the daily routine. Leave the wall connection in place for normal charging and use the vehicle connector as intended.
Hardwiring removes the wall plug and receptacle from the connection path. Replacing or moving the unit then requires electrical work.
For a new outdoor installation, ask the electrician to compare both approaches at the exact location. Weather protection, local requirements and the cable route can change which option makes sense.
Our hardwired vs plug-in EV charger comparison covers the tradeoffs in more detail. Neither format makes unsuitable wiring acceptable.
What does Level 2 EV charger installation involve?
Installation involves checking capacity, planning the circuit, mounting the equipment and configuring its output. The quote should cover the whole job from the panel to the parked vehicle.
Give the electrician the exact charger model and vehicle details. Include photos or measurements of the parking area so the wiring route and cable reach can be planned together.
Ask the quote to identify:
- The proposed charging output and circuit.
- The wiring route and any wall, trenching or conduit work.
- The receptacle or direct connection.
- Charger and cable-holder mounting.
- Any required permits and inspection.
- Monitor installation and setup, if included.
- Who completes app setup and explains normal operation.
A charger near the panel may need less wiring, but that location is useful only if the cable reaches the car safely. Plan for everyday access before choosing the shortest electrical route.
Do not assume an unused dryer or range outlet is ready for EV charging. Its wiring, circuit arrangement and receptacle need assessment for the proposed use.
If you rent or share a garage, settle permission, parking access and responsibility for electricity before arranging work. A charger that blocks another space or depends on informal access can be difficult to use consistently.
Our Level 2 charger installation cost guide explains what changes a quote. Read whether you can install an EV charger yourself before taking on electrical work.
Which smart features are worth having?
Choose smart features that solve a recurring charging task. Scheduling, energy records and load management serve different purposes, so decide which you actually need.
Scheduling can help align charging with your electricity plan. Confirm your utility's applicable hours and terms before assuming that overnight electricity is always cheaper.
Your car may already provide a charging schedule. If you also use the charger's schedule, make sure the allowed windows overlap or one system may prevent the other from starting.
Energy records help you understand how much electricity goes into charging. They can be useful for household budgeting, but do not assume an app's totals meet an employer's reimbursement rules.
Load management addresses available electrical capacity. It can reduce charging demand when other household loads rise, provided the system is properly designed and configured.
Check Wi-Fi reception with your phone near the planned mounting point before installation. For each connected charger, confirm which functions depend on connectivity and how ordinary charging works during a connection loss.
How should you use and care for a home EV charger?
Follow the equipment instructions, protect the cable and keep the connector clean and dry. Small habits help prevent damage and make charging easier to repeat each day.
After installation, have the electrician show you the configured current limit and normal status indicators. Keep those settings with the installation paperwork so they are available if the unit is reset or replaced.
Start with one clear charging schedule, either in the car or in the charger. Check that the vehicle reaches your intended charge level by departure before adding more automation.
Use the vehicle maker's guidance for routine battery charge limits. Home charging does not require filling the battery to its maximum every night.
Store the cable in loose loops on its intended holder. Keep the connector off the ground and avoid tight bends, door pinch points and pulling the cable by the handle.
Inspect accessible parts regularly for cuts, cracks, discoloration or loose mounting. Stop charging if you notice burning smells, unusual heat, damage or repeated faults, and arrange qualified help.
Clean the exterior only as directed by the manufacturer. Do not spray water into connectors, apply cleaners to contacts or open the unit for routine care.
If charging stops unexpectedly, check the vehicle's schedule, charge limit and the charger's status message. Repeated breaker trips need investigation rather than repeated resets.
What safety checks matter for home EV charging?
The equipment, electrical connection and mounting location must all suit the job. A certification mark on the charger does not approve the circuit or installation around it.
Check the exact model's certification and location requirements before installation. Our guide to UL and ETL marks on EV chargers explains what those marks help you assess.
Outdoor suitability applies to the complete setup, including the electrical connection. A sheltered wall can still face blowing rain, condensation and temperature changes.
Keep the charging cable away from vehicle tires and places where people can trip. Outdoor equipment should still be positioned to avoid standing water and unnecessary physical damage.
Do not use an extension cord to fix poor cable reach. Our EV charger extension cord guide explains why moving the charging location is the better solution.
Built-in ground-fault protection does not let you remove required circuit protection. Have the electrician resolve protection requirements and any nuisance trips according to the equipment instructions and local rules.
For related planning topics, see our home EV charger installation and safety guide.
What common buying mistakes should you avoid?
Avoid choosing by maximum amps, plug shape or app features alone. Most poor fits begin with a missed vehicle, circuit or parking requirement.
Buying the most powerful unit first can leave you paying for output the car cannot use. Decide what daily refill you need before requesting an electrical plan.
Confusing the wall plug with the vehicle connector can lead to ordering the wrong version. Check both ends separately, including any required adapter.
Treating an existing receptacle as ready for sustained charging skips a key inspection. Its appearance and location cannot tell you the condition of the wiring or connections behind it.
Choosing cable length from a straight measurement can leave the handle under tension. Measure around the parked car with room for doors and normal movement.
Assuming load management eliminates all electrical work can also distort the budget. The monitor, charger circuit and system setup still need a suitable installation.
Finally, do not buy before checking any rebate conditions. Some programs have equipment, installer or approval requirements that must be met before work begins.
Our home EV charger rebate guide covers where to start. Confirm current terms directly with the program before relying on a benefit.
How do you choose between these home EV chargers?
Choose the model whose connection style and features match an approved installation plan. Use the table to narrow the choice, then confirm the exact version before ordering.
| Your situation | Start with | Choose something else if |
|---|---|---|
| You want fixed charging with ChargePoint app controls | ChargePoint HomeFlex 50A Hardwired Charger | You need a removable wall connection |
| You have a suitable outlet and want ChargePoint app controls | ChargePoint HomeFlex NEMA 14-50 Charger | You need output beyond its plug-in limit |
| You want straightforward plug-in charging | Grizzl-E Classic 40A NEMA 14-50 Charger | Included home monitoring and load balancing are priorities |
| You want charging coordinated with household demand | Emporia Pro 48A Hardwired Charger | You have no use for its monitor and added setup |
If an existing outlet is suitable, compare the two plug-in options around how you want to manage charging. ChargePoint emphasizes app controls, while the Grizzl-E fits a straightforward charging routine.
For a new hardwired installation, decide whether you need household load management. That need gives the Emporia system a clear role; ChargePoint suits buyers focused on its charging app and fixed wall connection.
If none matches your vehicle connector or parking needs, broaden the search. Our best home EV chargers guide gives you another place to compare options without forcing one of these four into the job.
Which home Level 2 EV charger should you buy?
Buy a Level 2 EV charger that covers your daily refill within your normal parking window. Get the connector, cable route and electrical plan right before choosing extra output.
Choose the plug-in ChargePoint for an approved existing outlet and app controls. Choose the Grizzl-E when straightforward plug-in charging fits your routine.
Choose the hardwired ChargePoint for a fixed app-connected installation. Choose the Emporia Pro when its included monitoring and load management address a confirmed household need.
Before ordering, get the proposed output, circuit work and mounting location agreed with your electrician. Then compare the best Level 2 EV chargers for home against that plan.
Frequently asked questions
Is a Level 2 EV charger worth it at home?
A Level 2 EV charger is worth considering when Level 1 cannot replace your daily driving during your normal parking time; it also helps when you need to fit charging into a shorter window. If a suitable standard outlet already meets your needs, an upgrade may add little daily value.
How many amps should a home Level 2 EV charger have?
Choose enough output to replace your usual energy use within your charging window, subject to your car and circuit limits; have an electrician determine the permitted setting from the wiring, breaker, panel capacity and installation instructions. The breaker's amp number is not automatically the charger's allowed continuous output.
Should I get a plug-in or hardwired EV charger?
Choose plug-in charging when a suitable receptacle is already available and the supported output meets your needs; choose hardwiring when you prefer a fixed connection or need a model's higher supported output. If either option needs new wiring, compare complete installation quotes before deciding that plug-in will be simpler.
Can I use a J1772 charger with a Tesla?
A Tesla can use the J1772 ChargePoint chargers here with a suitable AC charging adapter; confirm compatibility in your vehicle manual, including any adapter current limit. Other vehicles with NACS ports also need a compatible connection, so match the actual charge port and charging method rather than relying on the vehicle brand.
Does a home EV charger need to be outdoors rated?
A charger mounted outdoors needs to be suitable for outdoor use, even under a carport or roof overhang; the electrical connection and cable route must also suit the location. Follow the equipment instructions and have an electrician check weather exposure, mounting, receptacle protection where applicable and access to the vehicle.